


· By Jami Cooley
How to Apply Self-Tanning Lotion Evenly Like a Pro
Self-tanning has revolutionized how we get a golden glow… no need to roast under the sun or risk skin damage from UV rays! But getting that perfect, streak-free, natural-looking tan at home takes more than just slapping on some lotion and hoping for the best. Poor application can leave you with uneven patches, orange tones, or those dreaded streaks. Don't worry—with a little prep and technique, you'll be glowing in no time.
Here’s your ultimate step-by-step guide on how to apply self-tanning lotion evenly, with tips for preparing your skin, choosing the right product, and perfecting your application.
Why Self-Tanning is a Game-Changer
Self-tanning is the safer, smarter alternative to sunbathing or tanning beds. Instead of exposing yourself to harmful UV rays, self-tanners give you that sun-kissed shine with none of the regrets.
Benefits of Self-Tanning Over Sun Exposure
- Keeps skin healthy: UV exposure can cause premature aging, wrinkles, and skin cancer. Self-tanning keeps your skin radiant and protected.
- Instant results: Need a glow for a weekend event? You don’t have to wait weeks to build a tan naturally.
- Customizable shades: With self-tanning products, you control the intensity. Go for a subtle tint or a deep bronze with ease.
That being said, the secret to a flawless tan lies in even application. Let's break it down.
The Importance of Even Application
Have you accidentally turned your ankles into zebra stripes or ended up with orange palms? Yeah, been there. Uneven application not only looks unnatural but can also make your entire tan look patchy or obvious. Luckily, it’s easy to avoid streaks with the right preparation and technique.
Why Even Application Matters
- No streaks or patches: Smooth coverage ensures your tan mimics a natural glow.
- Avoid orange tones: Incorrect application can result in over-saturation in certain areas (not cute!).
- Pro finish: Evenly applied self-tan gives your skin that radiant, airbrushed effect.
Skin Prep Essentials Before Applying Self-Tanner
The key to the best way to self-tan starts before you even open the bottle. Prepping your skin ensures the product glides on like silk and absorbs evenly.
Step 1: Exfoliate
Exfoliation is non-negotiable. Dead skin cells can cling to self-tanner, creating dark patches and uneven spots.
- Use a body scrub, exfoliating mitt, or chemical exfoliant to slough off dry skin.
- Focus on rough areas like elbows, knees, ankles, and feet.
- Exfoliate at least 24 hours before tanning if you shave or wax, as these can leave your skin sensitive.
Step 2: Lightly Moisturize Dry Areas
Grab a lightweight lotion and apply it sparingly to extra-dry areas like your knees, elbows, ankles, and wrists. This creates a subtle barrier so these areas don’t absorb too much tanning product.
Pro Tip: Avoid over-moisturizing your whole body, as it can prevent the self-tanner from sticking properly.
Step 3: Gather Your Tools
To apply self-tanning lotion evenly, make sure you’ve got the right tools:
- Tanning mitt or gloves to prevent orange palms and help spread the product smoothly.
- Barrier cream (optional) for tricky spots like nails or cuticles.
- A full-length mirror and good lighting to make sure you don’t miss a spot.
Choosing the Right Self-Tanning Product
Not all self-tanners are created equal. Choose the formula that’s easiest for you to work with and matches your desired outcome.
Lotions vs Mousses vs Sprays
- Lotions: Great for beginners and those with dry skin, as they’re hydrating and easy to apply.
- Mousses: Lightweight and quick-drying, ideal if you’re aiming for fast results or a professional finish.
- Sprays: Perfect for reaching tricky spots, but make sure to blend it out with a mitt for even coverage.
Gradual Tanners vs Instant Bronze
- If you’re new to tanning, a gradual tanner is your best friend. Apply it daily to slowly build up your tan.
- For instant results, go for a self-tanner with immediate color payoff, like Madara Fake It Natural Look Self-Tan Milk.
Pick the Right Shade
When in doubt, choose a shade that matches your natural skin tone for a realistic finish.
Self Tanning Application Made Easy
Now for the fun part! Follow these steps to apply your self-tanner.
Step-by-Step Application
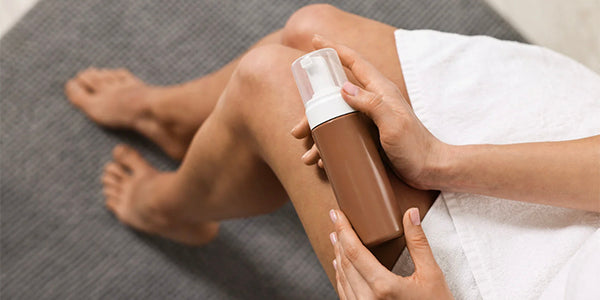
- Start with your legs: Work your way up so you don’t crease the product by bending over.
- Use a tanning mitt: Apply a small amount of product to the mitt and blend in circular motions.
- Focus on transitions: Blend carefully around tricky areas like ankles, knees, and wrists. Use a lighter hand for these spots to avoid buildup.
- Tackling your back: Struggling to reach your back? Use a long-handled applicator or wrap your mitt around a sturdy back-scratcher. Alternatively, enlist a friend for help!
- Face application: Use a smaller amount of product and mix it with your moisturizer for a subtle, buildable glow. Don’t forget your ears and neck!
Special Considerations
- Fingers and toes: Use a tiny amount and blend well to avoid dark spots.
- Wrists and heels: These areas tend to absorb more product, so apply lightly and blend carefully.
Aftercare and Maintenance
To keep your tan glowing and long-lasting, follow these simple aftercare steps.
- Wait before rinsing: Most self-tanners need 6–8 hours to develop. Wear loose, dark clothing during this time.
- Moisturize daily: Hydrated skin holds a tan better, so don’t skip the lotion!
- Avoid exfoliation: Skip scrubs and opt for gentle cleansers to maintain your tan.
- Touch-ups: If your tan starts fading unevenly, lightly exfoliate and reapply in patchy areas.
Fixes for Common Tanning Mistakes
- Streaks or patches: Use a damp cloth or lemon juice to gently buff out uneven areas.
- Orange hands: Rub a sugar scrub or baking soda paste over your palms to remove excess product.
- Too dark? Lighten your tan by soaking in a warm bath with baby oil, then exfoliate gently.
Shine Bright with a Sun-Kissed Glow
Mastering how to apply self-tanning lotion evenly takes a bit of practice, but the results are worth it. By prepping your skin, choosing the right product, and following these steps, you’ll achieve a streak-free, natural-looking tan that boosts your confidence and keeps you glowing year-round.
For quality self-tanning products, check out Sun Shield Shop.
Your golden hour starts now!